void AVICharacter::SetupPlayerInputComponent(UInputComponent* PlayerInputComponent)
{
	Super::SetupPlayerInputComponent(PlayerInputComponent);

	UEnhancedInputComponent* EnhancedInputComponent = CastChecked<UEnhancedInputComponent>(PlayerInputComponent);

	EnhancedInputComponent->BindAction(JumpAction, ETriggerEvent::Triggered, this, &ACharacter::Jump);
	EnhancedInputComponent->BindAction(JumpAction, ETriggerEvent::Completed, this, &ACharacter::StopJumping);
	EnhancedInputComponent->BindAction(MoveAction, ETriggerEvent::Triggered, this, &AVICharacter::Move);
	EnhancedInputComponent->BindAction(LookAction, ETriggerEvent::Triggered, this, &AVICharacter::Look);

}
void AVICharacter::SetupCharacterControl()
{
if (!IsLocallyControlled()) return;
APlayerController* PlayerController = CastChecked<APlayerController>(GetController());
if (UEnhancedInputLocalPlayerSubsystem* Subsystem = ULocalPlayer::GetSubsystem<UEnhancedInputLocalPlayerSubsystem>(PlayerController->GetLocalPlayer()))
{
if (Subsystem)
{
Subsystem->AddMappingContext(DefaultMappingContext, 0);
//Subsystem->RemoveMappingContext(DefaultMappingContext);
}
}
}
위 코드들은 기본적인 조작을 담당하는 코드의 일부입니다.
1인칭 캐릭터는 템플릿 기반으로 제작해 크게 설명할 것이 없을것으로 보입니다.
템플릿을 사용해 1인칭 캐릭터를 생성하고 constructorhelpers를 통해 에셋들을 지정해 주었습니다.
협업의 편의성을 위해 함수의 실행은 블루프린트에서 하되, 구현은 C++에서 하였습니다. 디자이너들이 로직을 이해할 필요가 있을 때 유용할 수 있을 것 같습니다.

SpawnInitialPrimaryWeapon.cpp
void AVICharacter::SpawnInitialPrimaryWeapon()
{
	if (UWorld* World = GetWorld())
	{
		if (PrimaryWeaponBpRef != nullptr)
		{
			// 스폰할 위치와 회전을 지정합니다.
			FVector SpawnLocation = FVector(0.0f, 0.0f, 0.0f);
			FRotator SpawnRotation = FRotator(0.0f, 0.0f, 0.0f);

			// 액터 스폰 파라미터 설정
			FActorSpawnParameters SpawnParams;
			SpawnParams.Owner = this;
			SpawnParams.Instigator = GetInstigator();

			// 월드에서 액터를 스폰합니다.
			PrimaryWeapon = World->SpawnActor<AActor>(PrimaryWeaponBpRef, SpawnLocation, SpawnRotation, SpawnParams);

			if (PrimaryWeapon)
			{
				// 스폰된 액터에 대해 추가 작업을 수행할 수 있습니다.
				FAttachmentTransformRules AttachmentRules(EAttachmentRule::KeepRelative, true);

				PrimaryWeapon->AttachToComponent(FirstPersonMesh, AttachmentRules, FName(TEXT("Palm_R")));

			}
			else
			{
				UE_LOG(LogTemp, Log, TEXT("Failed to attach"));
			}
		}
		else
		{
			UE_LOG(LogTemp, Warning, TEXT("MyBlueprintActorClass is null"));
		}
	}
}
위 코드를 이용해 액터를 월드 원점 좌표에 소환시킨 뒤 플레이어의 손바닥 소켓에 총을 연결해 주었습니다.
애니메이션 블루프린트도 간단하게 구현 해 주었는데, 아래와 같습니다.

++) 24.06.12
매 틱마다 Casting 을 수행하는 것은 성능에 악영향을 줄 수 있다고 판단되어 아래와 같이 Try Get Pawn Owner로 포인터를 간편히 가져오도록 수정 했습니다.
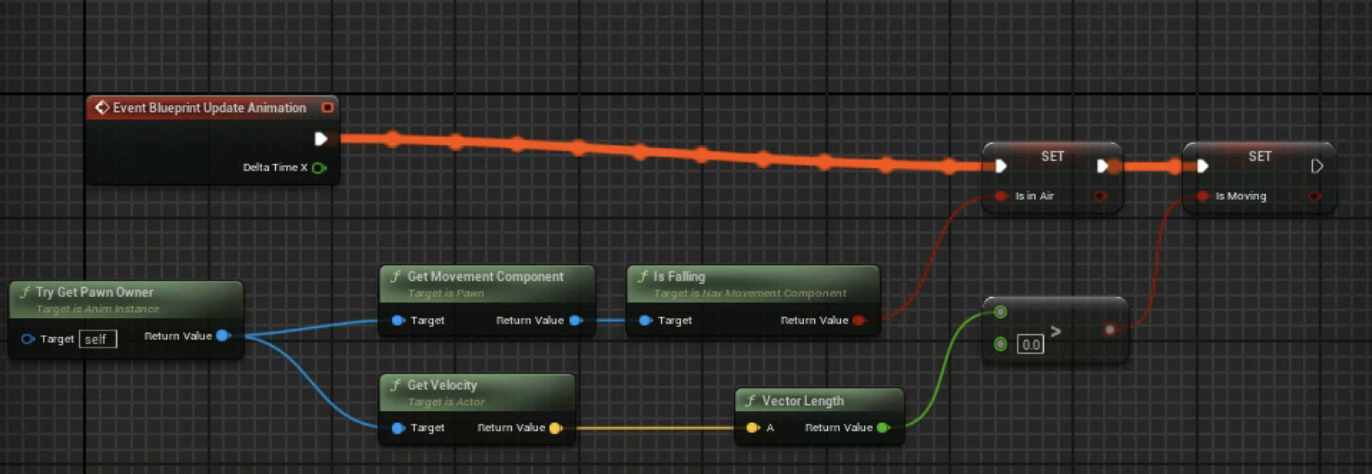

애니메이션 그래프는 기본적인 Locomotion을 따르도록 설계 되어 있습니다.
아래는 작업을 수행한 뒤의 실행 화면입니다.
실행 화면

깃허브
GitHub - chataeg/VI
Contribute to chataeg/VI development by creating an account on GitHub.
github.com
'언리얼엔진5 > FPS 게임 1인 프로젝트' 카테고리의 다른 글
| [UE5 FPS 프로젝트] 6. ADS(조준) 시스템 (0) | 2024.06.18 |
|---|---|
| [UE5 FPS 프로젝트] 5. 총 추가 구현 및 Swap (0) | 2024.06.17 |
| [UE5 FPS 프로젝트] 4. 총알 궤적, 총구 화염, 총알 자국, 탄퍼짐 구현 (0) | 2024.06.14 |
| [UE5 FPS 프로젝트] 3. HUD 및 피격 구현 (0) | 2024.06.13 |
| [UE5 FPS 프로젝트] 2. 발사 및 재장전 구현 (0) | 2024.06.13 |